
Contact Us
We make registering, hosting, and managing domains for yourself or others easy and affordable, because the internet needs people.
support@hostisland.org
Phone
+1 (470) 896-5407
F.A.Q.
Frequently Asked Questions
New ICANN's Inter-Registrar Transfer Policy
According to the regulations introduced by Internet Corporation of Assigned Names & Numbers (ICANN) starting from December 1, 2016, a new Transfer Policy will be in effect with all registrars. To better serve our customers and ensure ICANN regulations are followed, we are updating our Registration Agreement as described below.
The Transfer Policy was formerly known as “Inter-Registrar Transfer Policy” or IRTP. Until this new change, this policy only covered domain transfers between registrars (it’s the policy that mandates the Forms of Authorization to be completed by a registrant prior to a transfer). The new policy also covers the process of changing ownership of the domain from one entity to another (registrant to registrant). Every time a change of registrant takes place, the policy is called upon and a series of confirmation and approval emails are triggered. What’s important to note is that simple updates to a registrant’s first name, last name, organization and email address on a particular domain also trigger the same notification and confirmation emails.
Our approach to implement this policy is:
- To design the required processes in a way that meets policy terms and withstands an ICANN audit.
- To minimize the impacts for our customers.
- To leverage policy options such as the “Designated Agent” or transfer-lock opt-outs to streamline the process and reduce registrant/customer impact as much as possible.
The ICANN policy can be found at https://www.icann.org/resources/pages/transfer-policy-2016-06-01-en
What is a Designated Agent in the context of this policy?
The Transfer Policy allows Registrants to delegate giving their consent to a Change of Registrant to a third-party on their behalf. The policy defines such third-party as a Designated Agent (DA):
1.2 “Designated Agent” means an individual or entity that the Prior Registrant or New Registrant explicitly authorizes to approve a Change of Registrant on its behalf.
In practical terms, this means that a Registrant can give authority to Host Island to confirm a Change of Registrant. When Host Island is enabled to act as a Designated Agent, the Registrant will not need to receive or confirm an email in order for a change to proceed. Instead, Host Island will always auto-approve any Change of Registrant.
In order to support this option, Host Island has made a change to its Registration Agreement. In this agreement, we have added the following language:
You may modify the domain registration information from time to time in such a way which may constitute a “Change of Registrant” under ICANN’s transfer policy (the “Transfer Policy“). In such a case, you explicitly opt out of any 60-day inter-registrar transfer lock that would otherwise be imposed under the Transfer Policy due to any such Change of Registrant. In addition, you explicitly authorize us and/or the registrar of record to act as its “Designated Agent” (as defined in the Transfer Policy) to approve each “Change of Registrant” (as defined in the Transfer Policy) on its behalf. Such approval will happen automatically and, thereafter, the appropriate notices sent.
WhoisGuard has also changed their Terms of Service to authorize Namecheap as a Designated Agent for those who use their privacy services.
How to transfer a domain from GoDaddy?
When a domain is transferred, the nameservers associated with the domain will stay the same (e.g., ns1.OldRegistrar.com and ns2.OldRegistrar.com). However, since the domain is no longer with the old registrar, the old registrar’s nameservers will stop responding to queries for your domain. This will cause downtime until you switch your domain to our DNS.
NOTE: If you are using a third-party DNS such as your hosting company, the domain transfer will not cause any downtime issues, because DNS server settings will not change during the transfer.
Before placing a transfer request with us, you’ll need to obtain an Auth Code (if applicable) from GoDaddy and you will need to make sure that the domain is unlocked.
If you already have your code, log into your account, and click the banner below. If you haven’t, continue on to step 1 to find out how to unlock your domain.
Please don’t forget to disable any GoDaddy privacy protection plan you may have in place for your domain.
1. Unlock GoDaddy Domain
- Login to your GoDaddy account;
Important: Please make sure to switch to the ‘Advanced list’ view.

- Next to Domains, click Manage All:
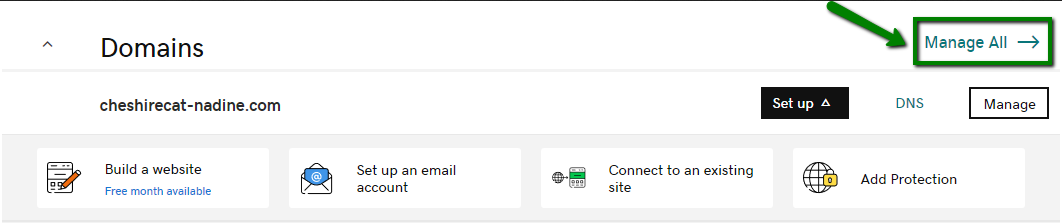
- Select the domain(s) to unlock and click the Off radio button next to Lock:

Important: There’s a 60-day lock feature that prevents transfers out of GoDaddy any time updates to the First and Last name, Organization name or Email address fields are made for the Registrant contact info set. Updates to any other piece of contact information should not trigger this feature. See this article (https://www.godaddy.com/help/change-domain-contact-information-418) for more details on updating contact information for domains at GoDaddy.
For cases where the 60-day lock has been placed on a domain name, GoDaddy provides a special process to remove this lock. Contact GoDaddy’s ‘Review 60’ department at review60@secureserver.net to have them review the case and remove the lock, if possible.
2. Obtain GoDaddy Auth Code
- Login to your GoDaddy account;
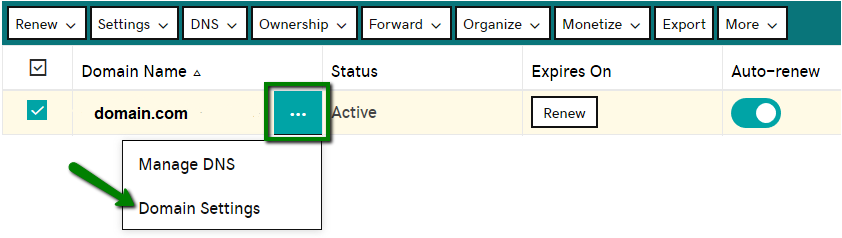
- Next to Domains, click on Manage All;
- Select the domain for which you need an Auth Code and click on Domain Settings:

- Scroll down to Additional Settings and click on Get authorization code
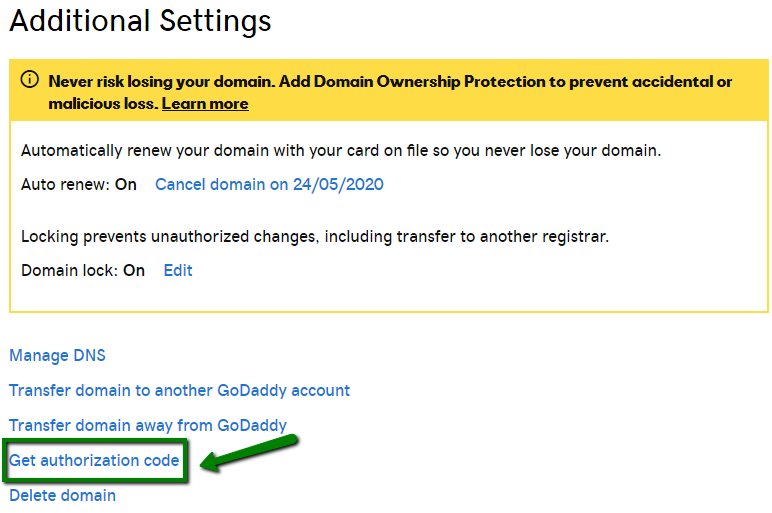
The Auth code will be sent to the Admin email address of your domain.
3. Disable GoDaddy Whois Privacy Protection (If Applicable)
If Whois Privacy Protection service for the domain is enabled, you will also need to disable it. When GoDaddy privacy protection is enabled, it is against their policy to allow domain transfers. Any GoDaddy Domain transfer requests submitted while DomainsByProxy is active, will be declined.
NOTE: Private Registration cancellations are irreversible. This means that once canceled, it can’t be enabled back and, if you decide to stay with GoDaddy, the private registration needs to be purchased again.
How to cancel Domains By Proxy Service with GoDaddy
- Login to your GoDaddy account;
- Next to Domains, click Manage All;
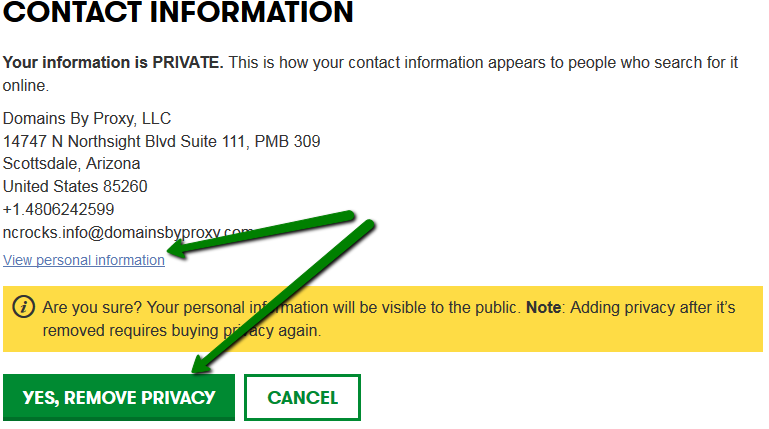
- Select the domain for which you need to cancel Domains By Proxy Service and click on Domain Settings:
- Scroll down to Contact Information and click the Remove Privacy link, then select Yes, Remove Privacy:
Once the domain name is unlocked and you have received your Auth Code, you may initiate the transfer to Namecheap. Please refer to this article for more information on how to transfer a domain to us.
4. How to Accept GoDaddy Transfer
Once the transfer request has been placed and the process has been initiated at the registry level (usually takes up to 20 minutes), you should be able to accept the transfer on GoDaddy’s side to speed up the process:
- Log in to your Account Manager;
- Next to Domains, click Manage;
- From the Domains menu, select Transfers;
- Click on Pending Transfers Out and select the domain name(s) you are transferring out of GoDaddy;
- Select Accept and click OK. The request will be processed within 15 minutes.
That’s it!
How to transfer hosting account without cPanel?
In order to transfer your hosting account from another hosting provider to Host Island, you will need to perform two important steps:
- Transfer your files/databases to your Host Island hosting account Point your domain name to Host Island hosting servers
- Backing Up and Migrating Files
Backing Up and Migrating Files
If your current hosting account does not have cPanel, you will need to create backups for every part of your account (databases, website files, emails, etc.) using the tools available in your current hosting account’s control panel:
- Back up and download the content of your website(s) to your PC
- Back up and download all your website-related databases (if the phpMyAdmin tool is installed on your current provider’s server.
- Upload the saved content of that old account to the root directory for the domain name in your Host Island hosting account (/home/user/public_html – folder for the main domain name; /home/user/public_html/addondomain.tld – for the addon domain name)
If you wish to use FTP to upload, you can connect to the hosting server’s IP address and log in with your new cPanel username and password provided by Host Island.
You can also use cPanel > File Manager tool if you have a backup of your content.
- Log in to cPanel and locate File Manager:
- Select the Upload option to upload your archive:
- Then restore it, using the Extract tool located in File Manager:
If you only have files without connected databases (e.g. an HTML website), you are officially finished with the process.
Restoring MySQL Databases
However, if you have a database already associated with your website, you will need to import it to Namecheap. To do this, please follow the steps listed below:
- Create a new database and a database user in your Host Island cPanel, then assign the user to that database.
- Now you will need to import the database dump (.sql backup file downloaded from the previous server) via the phpMyAdmin tool.
- Once you have completed the previous steps, you will need to enter in the new database connection credentials in the configuration files of your website (e.g. for a WordPress website this is wp-config.php file; for Joomla – configuration.php; for Drupal – settings.php). Please use the proper database name and username as they have their prefixes changed. In order to make sure you are using the correct ones, please navigate to cPanel > MySQL Databases:
Here is how the database information looks in the WordPress configuration file – wp-config.php:
NOTE: You should update your password to the one that was entered when creating your database user. If you prefer, you can also change this password to the one listed in the configuration file. This can be done in MySQL Databases cPanel menu. Also, keep in mind that ‘DB_HOST’ should always be ‘localhost’ on our servers. If you notice any other inputted value, please ensure you update accordingly.
Good news! The migration of your website is almost finished. To connect your domain name with your website on the new server, you must point this domain name to Host Island Hosting DNS. If you already have a Shared Hosting plan with Host Island.
However, before switching your domain name to Host Island Hosting DNS.
If you need to transfer your email accounts to your Host Island cPanel, you’ll find all the necessary information on how to do so here. Scroll down to the last three articles and depending on which mail client you use (Outlook, Thunderbird or MacMail), follow the steps that are clearly provided.
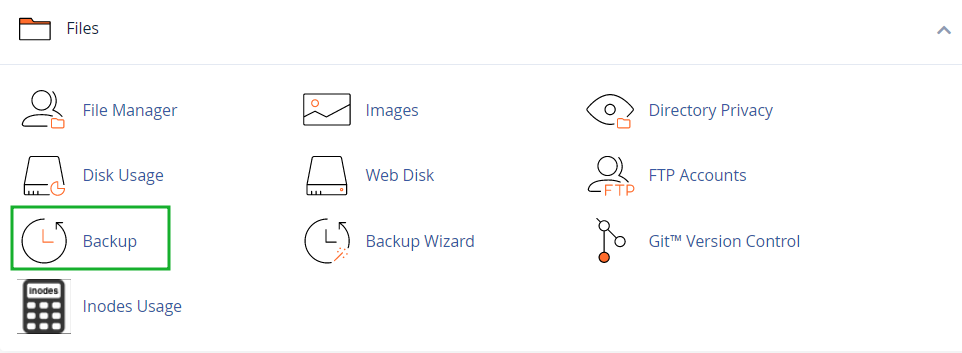
How to create and restore backups in cPanel?
The Backups menu in the section Files allows you to generate/restore backups of:
- a full cPanel account
- a MySQL database
- mail filters
- mail forwarders
A full cPanel backup includes all account files, databases, email accounts and settings.
We recommend creating a full cPanel backup before any major data modification/migration.
1. Go to cPanel > Files section > Backup menu:
2. Click on Download a Full Website Backup:
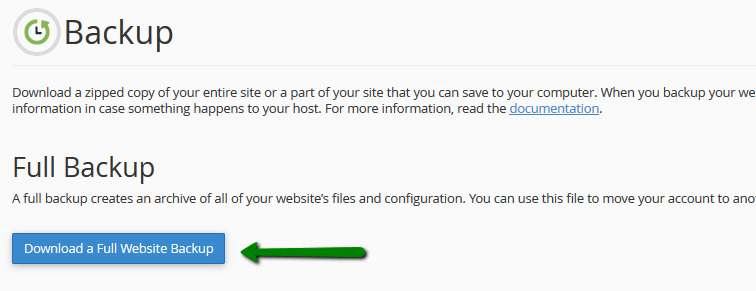
3. By default, a full cPanel backup will be saved into your account home directory.
Go ahead and change Backup Destination if you would like to choose another target location for the backup.
Click on Generate Backup to proceed:

4. You will see the following message notifying about the start of the backup generation process:
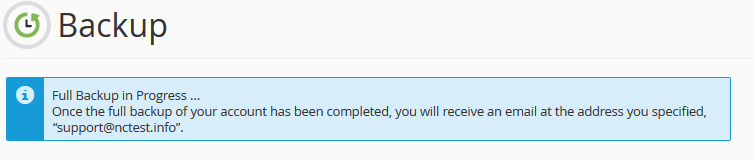
5. Click on Go Back to monitor the status of the generation process real time.
The green checkmark next to the backup name will indicate that the backup generation has been completed.
You can now either download it or navigate to the remote server to see if the backup is there:

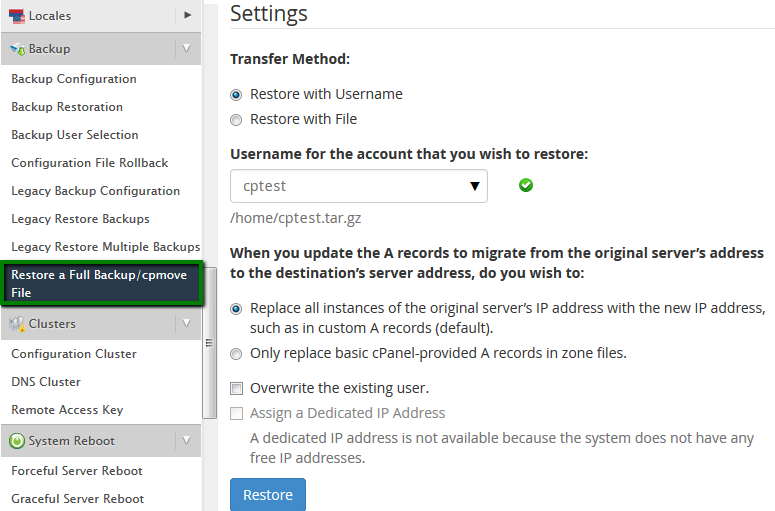
If you have a VPS or Dedicated server with root access, you can restore the full cPanel backup yourself in WHM > Restore a Full Backup/cpmove File.
PLEASE NOTE: This will overwrite all the existing files, so before proceeding make sure there is nothing important left.
You can fully restore a cPanel backup on your side only with our Stellar Plus and Stellar Business plans via the AutoBackup menu in cPanel.
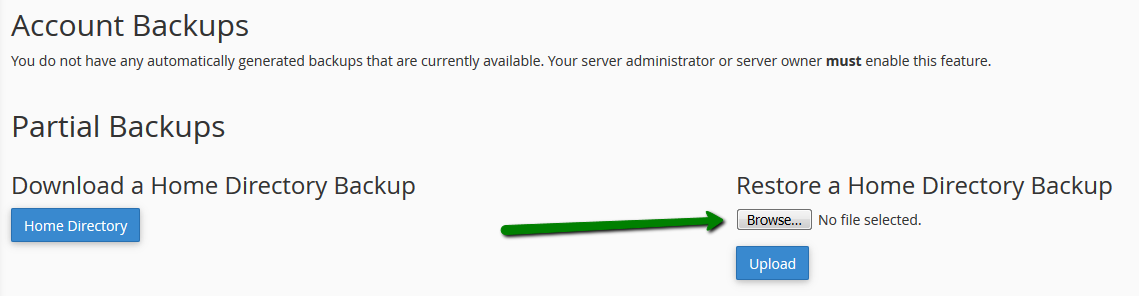
In case you wish to restore the files in your Home Directory, you may use Backup >> Restore a Home Directory Backup cPanel option.
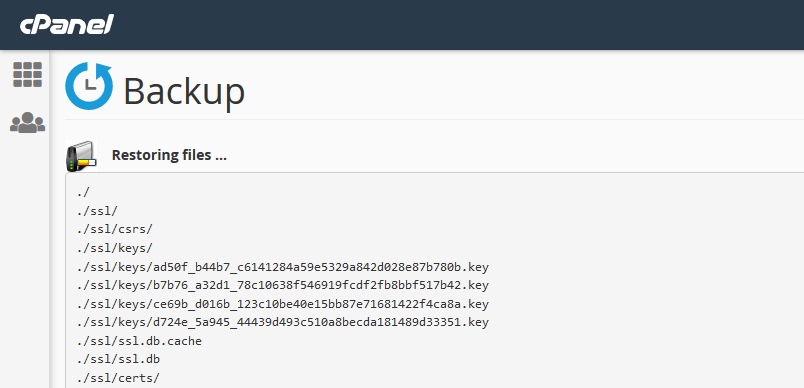
After locating this menu, select the backup file that you wish to restore and click Upload:
You will be redirected to the next page and within a minute you may see the Restoring files tab:
That’s it!
How to transfer hosting account to Host Island?
Having your website up and running is crucial for the majority of people transferring their hosting accounts to us. That is why we would like to offer a few hints on how to avoid the downtime caused by the DNS propagation after the nameservers change, or at least make it shorter and less harmful to your business.
From the beginning till the end of transfer process your account with the current provider should be active, and your website up and running. Once your hosting account content is fully copied to our servers, it is time to change the nameservers to our hosting ones. Since your account with OLD host is still active, a part of requests will still go to the old server, while another part will see the website from our server already. This does not cancel DNS propagation, but makes it “invisible” though. In approximately 24 hours DNS propagation ends, and all of your visitors will be directed to your hosting account at Namecheap. At this point, the transfer process can be considered as completed in full.
Therefore, the best time to cancel your account with the old provider is 48-72 hours after the nameservers change.
What is a domain transfer?
A domain transfer refers to the process of changing the designated registrar of a domain name. Once a transfer has been made, the new registrar will maintain all relevant information regarding the domain and the registrant. Domain names may be transferred only if they have been registered with the previous registrar for 60 days or more .
How do I transfer my existing domain to Host Island?
Domain transfers can take anywhere from 30 minutes to 8 days to complete. The exact time-frame depends on the domain’s TLD and the time required for your current registrar to complete the process.
Here are the steps to transfer a domain to Host Island:
1. Verify that your domain is eligible for transfer
Before initiating the transfer, make sure your domain qualifies for it. Here are the standard requirements for most domains, including all gTLDs (e.g., .COM / .NET / .ORG etc.), new gTLDs (e.g., .BID / .CLUB / .TRADE / .TECH etc.) and some ccTLDs (.TV / .ME / .CO etc.):
- The domain must have been registered or transferred at least 60 days ago;
- The domain must be unlocked at the current registrar (its Whois status should read OK or Active);
Some ccTLDs (.ES / .UK / .IO TLD, etc.) have additional transfer requirements and/or exclude some points from the list above. Please check the specific transfer requirements for your TLD here.
2. Order the transfer
After verifying that your domain name meets all transfer requirements, feel free to purchase the transfer at Namecheap.
To start, make sure you have logged in to your account, and then click the banner below.
Next, follow these steps:
- Sign into your Hostisland account and go to the Transfer page (“Domains” drop-down menu).
- Enter your domain into the search bar in the domain.tld format. Any protocol like https:// or subdomain like www should be removed. Click “Transfer“.
- Verify that your domain is prepared for the transfer and checkboxes next to the corresponding fields.
- Provide the Auth/EPP code.
- Add the transfer to the cart and check out using your preferred payment method.
How can I transfer an expired domain from GoDaddy?
If your domain has expired, it is possible to transfer it if the following conditions are met:
- The domain has to be unlocked for transfer;
- You have Auth/EPP code for the domain;
- The domain should be within the reactivation grace period at GoDaddy;
- The Whois Privacy Protection should be disabled.
For some domain name extensions, primarily country code (ccTLD) extensions, there is no grace period. They go to the ‘redemption’ period immediately after expiration.
Important: If your domain expired with GoDaddy and you renewed it with them, then we suggest you not to transfer it within 45 days of the previous expiry date since GoDaddy may revoke the renewal year in this case. If you have initiated the transfer within 45 days after such renewal, and if the transfer is already completed, you should check with GoDaddy regarding a possible refund. However, we would like to warn you that not all registrars make refunds to customers in such cases.
If your expired domain is within the grace period, you can still obtain the Auth/EPP code and unlock it for transfer (if needed).
Note: If the Administrative contact email address listed for your expired domain is inaccessible or is invalid, you cannot change it as contact information for expired domains cannot be changed. So the transfer will not be successful in this case.
If the Administrative contact email address is valid and is accessible, please proceed by following the steps below.
- Log in to your GoDaddy account;
- Next to Domains, click Manage All;
- Select the domain(s) to unlock and click the Off radio button next to Lock.
- Log in to your GoDaddy account;
- Next to Domains, click Manage All;
- Click on the domain(s) to get to the Domain Settings page;
- Scroll down to the Additional Settings section and select Get authorization code. The authorization code will be sent to the admin email address for the domain name.
Do you offer a free trial period for hosting?
No, we don’t provide a free trial period. But you can get a full refund for a Shared Hosting, VPS, or Dedicated Server.
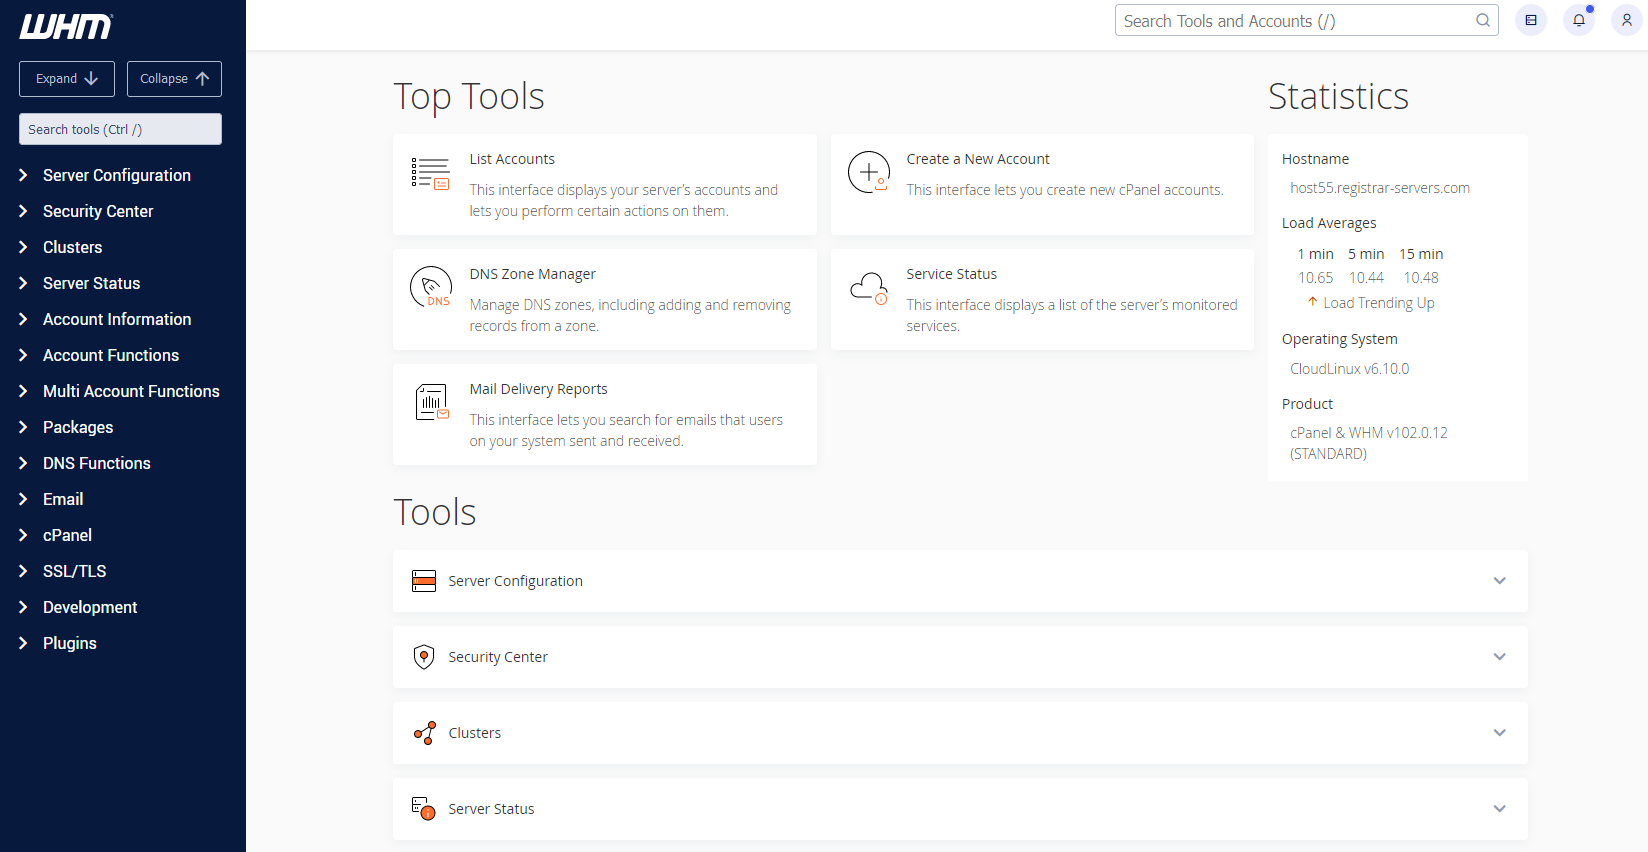
What is the Difference between cPanel and WHM?
WHM (WebHost Manager) provides administrative control over your dedicated server or VPS. It allows a hosting provider to manage a customer’s account.
WHM is also a reseller control panel. It is what our customers receive with all Reseller hosting plans and use to manage all their resold hosting accounts in their reseller plans. However, a reseller has restricted reseller rights in WHM comparing to VPS and Dedicated Servers WHM (root user rights), so some functions are not available for them:
In WHM, you can:
- create individual accounts
- create custom hosting packages
- add domains to the server
- manage features of hosting packages and accounts
- reset passwords/contact email addresses for cPanel accounts
- edit Resource Limits for cPanel accounts
- modify DNS zone records for each domain/subdomain
- set up private nameservers on the server
- access resold accounts without entering login details
- perform basic system and control panel maintenance
For more information about reseller WHM options, refer to this article.
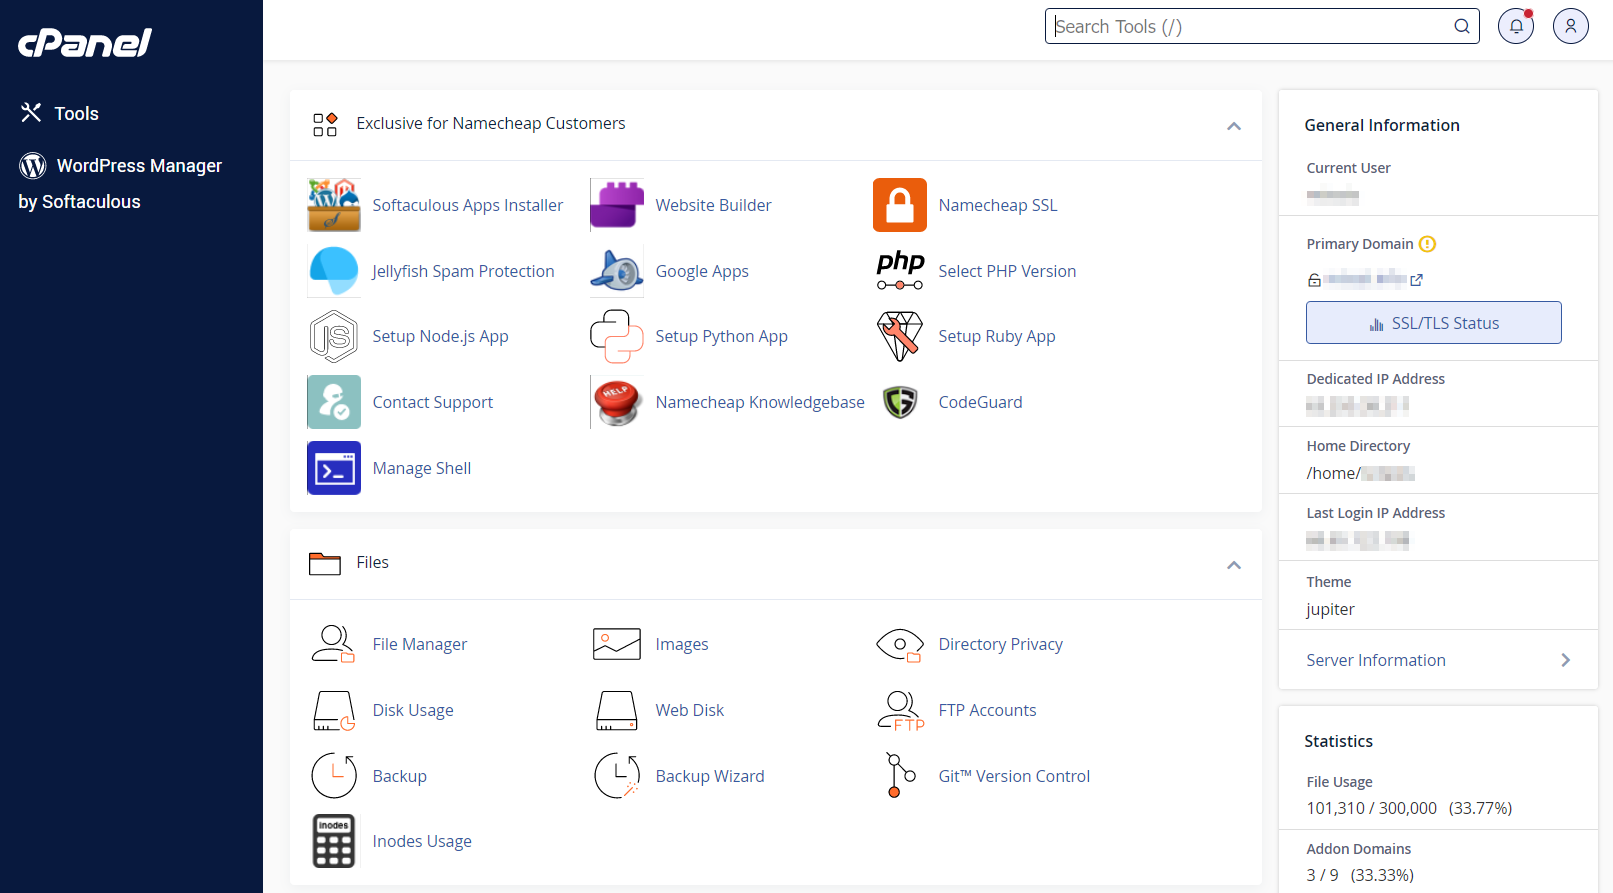
cPanel is designed for managing separate hosting accounts on the server. End users/clients are able to:
- install CMS using Softaculous
- upload and manage files for their websites
- add/remove addon domains and subdomains
- create email accounts and manage email settings and SPAM protection
- edit DNS records for their domains
- check website statistics
- manage databases and backups, etc.
Take into account that when accessing cPanel via WHM of a reseller or root user, you can manage almost all options of the end user’s cPanel. However, some menus (like GoogleApps) can be accessed only when you are logged in as an individual cPanel user.
Here is the structure of WHM/cPanel users depending on their permissions:
1. Server Administrator Panel (root access to WHM)
The top tier and highest-level user is the ‘root’ user. This is the server administrator who has full access to the server. The server administrator has total control over all WHM functions and can modify global server settings as well as customize settings for users with more limited privileges. A root user can access all levels of WHM interface, including reseller WHM and an end cPanel user. There is only one root user per server.
2. Reseller Panel (WHM)
The reseller user is a subordinate of the server administrator.
A reseller user has a more limited set of features comparing to the root user. They are limited by the server administrator to the features which affect the reseller’s customers’ accounts but not the whole server.
Reseller access is provided with Reseller Panel (WHM) where they can manage all their resold accounts. The reseller also has access to all created accounts (‘resolds’). The privileges of the reseller are set by the server administrator. There can be multiple resellers per server.
3. Main Reseller cPanel
cPanel is a control panel used to manage the hosting account under your main domain. When you sign up for a Reseller package, you select a main domain name, it can be accessed via the main cPanel account. Login details for this cPanel coincide with WHM account details. If you need to reset the WHM password, it is required to reset the main cPanel account password, and they will both synchronize.
4. cPanel account (resold)
Resold accounts are owned by the Reseller Panel (WHM). Resold accounts can be easily created, managed and maintained in Reseller Panel (WHM).
That’s it!
How to Create a WordPress Staging Site?
WordPress, although the most popular blogging software with thousands of users, somehow fails to be the most reliable website builder. Nowadays, reliability is something that goes along with any type of product development. Have you ever wondered if a certain update or change would shut down an entire website or make it look like it had never been up in the first place? Staging websites can be a very useful way to avoid such inconveniences and make the user experience of your website visitors seamless.
If you are still unsure whether or not you need a staging website, check the reasons below:
- It gives you the ability to test all types of changes before pushing them to your main website or going live.
- It reduces the amount of time of your website is blocked to visitors while in “Maintenance mode” because deploying the changes you have already tested takes less time.
- The chances of implementing an irreversible change are reduced to a minimum when you test before switching content to live pages.
- The aforementioned point results in your website’s higher SEO ranking and reputation while keeping your visitors satisfied.
30 Days of Free Hosting
Donec sollicitudin molestie malesuada. Lorem ipsum dolor sit amet, consectetur adipiscing elit. Vestibulum ante ipsum primis in faucibus orci luctus et ultrices posuere cubilia